One of the things I do when I set up a new computer is installing and customising Adium, the Mac chat client.
Adium is an amazing application. It connects to all the major chat networks, has a great default appearance, and doesn’t really cause me any problems. But a while ago I started playing around with Adium’s appearance, just because I could, and came up with a new design that looked kind of nice.
I’ve had to redo these changes on a couple of computers now, and I often forget exactly what customisations I do. This time I thought I’d write them down as I did them, for future reference and for anyone else to play around with.
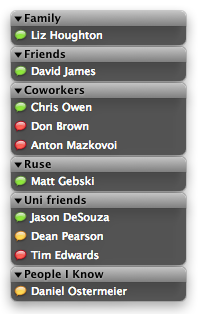
Adium with my customisations
What you can’t see in the screenshot is that the contact list is slightly transparent. In general, I don’t like transparent windows, because they make the text hard to read. In this case, however, it seems to work fairly well for my contact list. Probably because I’m not actually reading it very often, and I have adjusted the text to make it stand out more.
Here are the steps to customise it in this way:
-
In Adium preferences, go to the Appearance tab. Select ‘iBubble status’ in the Status Icons drop-down.
- Click on the Theme drop-down and select ‘Add New Theme…’. Give it a name and make the following customisations:
- set the background to black
- turn off highlight and alternate grid
- on the status tab, set online to white and offline to 25% grey
- still on the status tab, turn off the other status colours and tick ‘Dim icons of online contacts at the bottom’
- for the groups tab, pick black text and two shades of grey that work with this. I set the text shadow and first background colour to 25% grey, and the second background color to 50% grey.
- Click on the List Layout drop-down and select ‘Add New Layout…’. Give it a name and make the following customisations:
- select left alignment for contacts
- leave the fonts at 11pt and 10pt Lucida Grande
- uncheck the ‘Show (idle status) (below name)’ option
- uncheck the ‘Show user icon’ option
- check the ‘Show status icons’ option and select the ‘Far Left’ position from the drop-down
- uncheck the ‘Show service icons’ option
- leave the groups tab settings with the default, bold Lucida Grande 11pt, left-aligned
- set the spacing to the following values: Spacing 6px, Left Margin 1px, Right Margin 1px, Mockie Spacing 2px.
-
Set the Window Style to ‘Group Bubbles’.
-
Set the opacity to 66%.
- Set the width to 175 px.
That’s pretty much it on the appearance customisation. I don’t really customise the message view at all.
On the View menu, I hide offline contacts and sort contacts alphabetically. I also have Show Groups enabled.
The only other setting I always change when installing Adium is on the ‘General’ tab, where I make the keys to switch tabs Command-brackets. Otherwise Command-left and Command-right don’t go to the start and end of line like other Mac applications.
